Sometimes things don’t work out the way you plan. I had a big two month trip out to the Pacific Northwest all set and was ready to announce the Paper Trail 10 schedule for September and October.

Three dimensional art... with heart
Sometimes things don’t work out the way you plan. I had a big two month trip out to the Pacific Northwest all set and was ready to announce the Paper Trail 10 schedule for September and October.
Hello there! It’s time for some more Twist and Style Tutorials. All month-long the Inspiration Team has been sharing ways to add a creative “twist” to your craft projects with my new Twist and Style Tool from Sizzix. The team has been twisting up a creative storm and they’ve got a fresh batch of twisted projects to share with you this week. Let’s have a look at what’s twisting today.

Shelly Hickox has a darling Halloween Fairy Cloche to share with you today. Shelly used the twist and style tool to twist up a wire cloche! How clever indeed! I just love that cute fairy witch atop a “Boo-tifully” decorated cupcake stand die cut.

Fly over to Shelly’s Blog for a full tutorial on how to create your own Wire Cloche using my new Twist and Style tool. She’s even sharing a free download for you to create your own fairy witch.
Jonathan Fong has a Twist and Style tutorial that is so doggone adorable you may not be able to handle the cuteness! This twisted floral crown uses the twist and style tool and fabric flowers cut with my Paper Flower Party dies. Can you handle the cute of Jonathan’s furry little model? I can’t.

Visit Jonathan’s Blog where he’ll show you how to twist and style your own fabric flower crown for a furry friend or a pretty princess of any age!
Julia Aston has a mixed-media project to share with an organic “twist”. She used the Twist and Style tool to create wire blooms which she then adhered to a piece of barked wood! How’s that for creativity….with a twist?

Take a walk through the “wood” over to Julia’s Blog where you’ll learn how to ink, stamp and stencil organic elements and twist your way to a fabulous mixed-media project!
Wow! Talk about creativity with a Twist! Hope you enjoyed this weeks Twist and Style Tool creations. In case you missed any of the previous Twist and Style Tutorials you can check them out by following the links below…
See you soon!
Eileen
Hey everyone! Are you ready for more Twist and Style Tool Project Ideas? Last week we introduced you to my new Twist and Style Tool from Sizzix. This handy-dandy tool allows you to add a creative “twist” to your art and craft projects. The Twist and Style Tool makes it easy to twist wire, ribbon, raffia and more! This week the Inspiration Team is sharing more Twist and Style Tool Project Ideas to inspire you. Let’s have a look at some new ways to get creative…with a twist~!
Julia Aston starts us off with a twisted Halloween project you’re sure to go batty over! Julia has created a “charming” bottle of brew for everyone’s favorite fall holiday. Not only that she’s sharing a detailed tutorial showing you how to add charms to your wire twists with the Twist and Style Tool.

Visit Julia’s Blog for a closer look at her creative concoction and learn how to create your own twisted bottle of Halloween brew!
Anne Redfern got her twist on BIG time! Our dear Anne has not one but THREE Twist and Style Tool Project Ideas to share. First, we have these wonderful wire flowers which make a lovely accent to decorate my scalloped flap box. Anne is sharing the clever technique she used to create these wired lovelies on her Blog.

Next, Anne created a totally twisted flower complete with wired stem, leaves and even a cute little birdie inspired by Inspiration Team member Tracy Evan’s project. You’ll find all the information you need to twist your own beautiful blooms and birds in Anne’s Tutorial HERE.

For her final act Anne created a gorgeous wire earring tree. Now that is creativity with a twist! Who needs a fancy earring holder from a boutique shop when you can easily twist one yourself with the Twist and Style Tool.

Get wired with Anne and add a creative twist to your projects with three fabulous Twist and Style Tool Tutorials you can find HERE.
I do hope you enjoyed this weeks Twist and Style Tool Project Ideas. If you missed any of the previous Twist and Style Tool Projects you can check them out HERE. The Tool will be shipping today so keep checking your local stores and my Sizzix Catalog. We’ll see you next week with more Twist and Style Tool inspiration.
Eileen
Hello everyone, this month the Inspiration Team will be introducing you to my new Twist and Style Tool. This new tool allows you to add a creative twist to any of your projects. If your tired of sore fingers from hand twisting wire, ribbon and the like this is the tool for you! My new Twist and Style tool allows you to create a perfectly even twist with just a few turns. This means no more bumpy ribbons and wires or sore fingers for you. Woo Hoo!!
If you are wondering how the Twist and Style Tool can help you create beautiful projects the Inspiration Team is here to show you all the wonderful ways you can use my new tool for your creative endeavors. The Twist and Style Tool will be available soon so check your local stores and the Eileen Hull Sizzix Page for updates. In the meantime, sit back and enjoy this weeks creative projects…with a twist!
Tracy Evans starts us off with a Twist and Style Tool project that will melt your mixed-media loving heart! This set of Artist Trading Blocks makes my artful HeART all aflutter! Tracy has even included a coordinating card. I just love how she used the tool to create these wonderland inspired wire hearts, sprinkled with some of her mixed-media magic, and topped off with pouring medium.

Take a trip over to Tracy’s blog for a full tutorial on how to create these fabulous wire hearts with my new Twist and Style Tool!.
Pam Bray has created a plethora of pretty projects using my new Twist and Style Tool. These elegant gift card holders feature flowers from my Paper Flower Party Sizzix collection adorning my Needle Book die and Scalloped Flap Box. Pam used the tool to add wired floral elements and create gorgeous bejeweled handled for her gift card holders. Wow!

Visit Pam’s Blog where she shares how she added a creative twist to her fabulous floral gift card holders.
I hope you enjoyed a first look at my new Twist and Style Tool from Sizzix. The Inspiration Team will have more creative projects to share with you all month so stay tuned!
Eileen
Hey everyone! There’s always something to celebrate and the Inspiration Team has been partying all month-long with creative party decor ideas using Eileen Hull Sizzix dies. Today we’re sharing the ultimate list of Sizzix Party Decor Tutorials that you can use to create fun favors, centerpieces and more for your next event. Let’s get this Sizzix party started!

Donna Budzynski starts us off with an all out Eileen Hull Sizzix party bonanza! She’s got some serious Sizzix Party Decor Tutorials using a bunch of my dies. Not to mention the cute and clever party ideas Donna’s cooked up. This girl has been BUSY creating everything from banners, to treat containers, place cards, favor bags and more!

RSVP to Donna’s Blog where she shows you how to create the ultimate party using Eileen Hull Sizzix dies.
Anna-Karin Evaldsson has a fun party game to share that will have your guests getting creative. AK used my Suitcase Die to pack a container filled with creative possibilities! Inside you’ll find flower die cuts from Paper Flower Party, brads, rhinestones and other crafty supplies that party goers can use to decorate their suitcases.

Pack your bags and learn how to give your party guests the gift of creativity by visiting Anna-Karin’s Blog for a full tutorial on how to create this Suitcase Creative Treasure Chest.
Tonya Trantham shows you how to dress up dollar store gift bags with my new Paper Flower Party dies. Whether you are handing out these gift bags at a bash you are hosting or attending a party and bringing a gift this project is easy to create. These gift bags look like they came from a fancy stationery store. Your guests and gift-ees will never know you didn’t spend a mint on them.
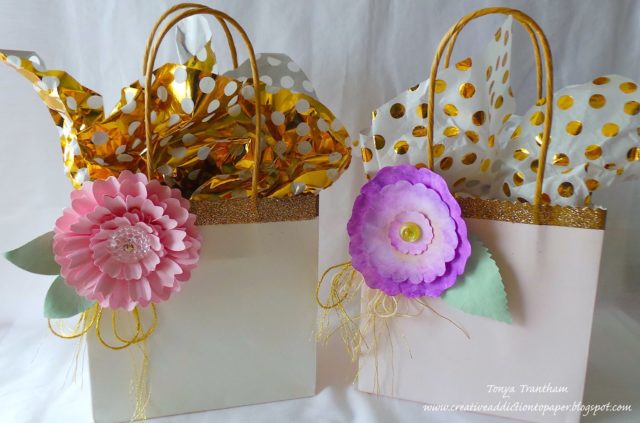
Stop by Tonya’s blog for a tutorial on how to dress up your own gift bags with different Sizzix flower dies from Paper Flower Party!
Jonathan Fong has a fun place card tutorial that will have you feeling nostalgic. How cute are these Retro TV place cards? Jonathan used my Luggage Tag die to create these quick and easy place cards. Just because you’re short on time doesn’t mean your party has to suffer on style as Jonathan proves with this delightful project.

Get out the rabbit ears and tune into Jonathan’s Blog for a full tutorial on how to create these adorable Retro TV Place Cards.
Drab place settings getting you down? Anne Redfern has just the solution perfect for your next garden party, shower or bbq. These Honey Comb Cutlery Holders are just what you need to set the prettiest of tables. Anne used my Box with Scalloped Flap to create a lovely cutlery holder which she prettied up with my Heart and Soul Flower and added texture using my Honey Comb embossing folder.

Find out how you can create your own Honey Comb Cutlery Holders at Anne’s Blog.
Shelly Hickox shares a favor box tutorial that your guests will think you spent HOURS creating. When you think of Shelly Hickox projects simple is the last thing that comes to mind but believe it or not this project is just that! All you need to do is cut, emboss, assemble and add a quick coffee filter flower and you are DONE.

Visit Shelly’s blog for a simpler than you think tutorial on how to create this lovely Embossed Kraft Favor Box.
Nicole Wright LOVES all things fall. Nicole’s Fall Place Card project will get you in the mood for the season soon to be upon us. I can almost smell the crisp fall air and taste the apple cider…sure hope I’m invited! Nicole has some pretty cool coffee filter flower techniques to share using my Pansy Die and an old favorite from way back when…my place card die.

“Fall” in love with this Autumn themed Place Card project and get the full tutorial at Nicole’s Blog.
Diana Hetherington ends our Sizzix Party Decor Tutorials with a cute Scalloped Box project that will help you remember all of your upcoming events. You’ll never forget a Birthday, Anniversary, Wedding or Shower again with Diana’s handy “Important Dates” box. This project will help you keep YOUR important dates straight all year-long!

Stop by Diana’s blog (and don’t be late) for a very, Important Dates Box tutorial.
I do hope you enjoyed all of the Sizzix Party Decor Tutorials shared here this month. In case you missed any of the previous projects you can check them out by following the links below…
You can find all of the Eileen Hull Sizzix Dies used in these projects HERE. Good news my Paper Flower Party Dies and Re-released Sizzix Favorites are back in stock! Get them while supplies last.

If you’ve been inspired to create your own party projects using Eileen Hull Sizzix dies I would love for you to share them on my Facebook Page.
Stay tuned next week as the Inspiration Team shows you all the creative ways you can use my new Twist and Style tool!
Eileen
Hey everyone the Inspiration Team is back again with more Sizzix Party Ideas to share with you. Planning a party? Learn how to create your own favors, decorations, centerpieces, invitations and more with your Sizzix machine and Eileen Hull dies. You’ll find all kinds of creative ways to make your next wedding, shower, birthday party or special event extra special with these project DIY Sizzix Party Ideas and project tutorials.
Lisa Hoel gets our Sizzix party going with a 3-D Tea Cup Favor Box project. Whether you are hosting a Bridal Shower tea party, Brunch, Birthday, or Baby Shower, this is a darling favor to send home with your guests. Not only is Lisa sharing a fun technique on how to create custom stamps using your favorite Sizzix dies- she also has a paper flower making tutorial using my new Heart and Soul Flower die from Paper Flower Party.

Stop by Lisa’s blog for a cuppa tea and technique packed tutorial on how to create this adorable 3-D Tea Cup Favor Box yourself!
Julia Aston has a treat jar project sure to make a splash at your next event. This Lily Pad treat jar holds yummy gummy frogs that will delight “kids” from 2-100! Julia’s fun froggy creation uses tissue paper and my Romance Flower die to craft a favor that your guests will think you spent hours or a fortune on.

Hop over to Julia’s blog for a full tutorial on how to create your own Lily Pad Treat Jar with Eileen Hull Sizzix dies. You’ll also find some satisfied party goers enjoying their frog filled favors.
Diana Hetherington shares a textured canister favor project bursting with colored RENDR paper Swirl Flowers! The textured white matboard canister she’s created lend a lovely background for her gorgeous colored paper flowers. A ribbon of black tulle completes the look of these fabulous favors perfect for a wedding, shower or birthday party.

Stop by Diana’s blog for a colorful paper flower tutorial and textured Canister die tips.
I do hope you have enjoyed this weeks round of Sizzix Party Ideas from my oh so talented Inspiration Team. You can find all of the dies used in these projects by following the links below…
For a complete list of Eileen Hull Sizzix Dies click HERE.
We’ll see you next week with more Sizzix Party ideas!
Eileen
Summer is in full swing and backyard BBQ’s and bashes are our thing this month. For the month of July the Inspiration Team will be sharing their creative ideas for Sizzix Party Decor. You’ll find ideas for storage, centerpieces, favors and more that you can create with your favorite Sizzix dies for your next party, bbq or bash. Let’s get this Sizzix party started!
Tracy Evans gets us going with a Sizzix Party Decor Centerpiece. Tracy’s project was created using my Canister Die, Romance Flower, and Textured Impressions folders from Paper Flower Party. This centerpiece is easy to create and will add loveliness to your tablescapes that you can use again and again!

Visit Tracy’s blog for a full tutorial including a super cool gelli printing technique and coffee filter flower tips and tricks!
Pam Bray also used my Sizzix Canister die to create a stunning Seaside Picnic Organizer. Pam’s project creates a lovely space to store picnic essentials like napkins, cutlery and candies! This Sizzix Party Decor piece is covered in pretty papers and a plethora of Sizzix dies including my new Pansy die from Paper Flower Party! You’ll definitely want to check out Pam’s supply list for this pretty project.

Stop by Pam’s Blog and learn how to create your own Picnic Organizer for your next outdoor event.
You can find all of the Eileen Hull dies used in these Sizzix Party Decor projects by following the links below. For a complete list of Eileen Hull Sizzix Dies click HERE.
Do you have a Sizzix Party Decor project to share? We would love to see YOUR ideas too. Share your projects on my Facebook page for a chance to be featured on my blog.
Stay tuned next week for more Sizzix Party ideas from the Inspiration Team!
Eileen

It’s the 30th of June and I am here with the last Crescent Photo Mat Project! What an amazing month it has been…
We hope you have enjoyed the teams’ exploration of RENDR No Show Through paper and Photo Mat Art Boards from Crescent. I was blown away by the amazing and creative ways that the Inspiration Team used these products. If you haven’t seen them all yet, look here:
I had to get in on the fun too…
Here is a sneak peek of one of the classes I will be offering on Paper Trail 10 coming up in September/October!

The base of this project is the Crescent 11″ x 14″ Photo Mat Art Board and I added lots of mixed media techniques. In class you will get to play with new Sizzix Flower dies, ColorBox Blends Inks, stencils and the long awaited Twist & Style Tool.
If you would like me to stop in your local store for some classes, let your store owner know and have her contact me at eileen@eileenhull.com and we can have a chat. I will be traveling from Virginia to the Pacific Northwest and down through Texas on the way back.
Other things happening…
Every Tuesday night at 6 pm EST, we are meeting at Eileen Hull Designs on Facebook for the Paper Flower Party… and more! If you haven’t experienced a live event yet, you are in for some fun. Folks from all over the world are in the chat- we share ideas and I do a project or technique. It’s last for 30-40 minutes and then stays available on Facebook, so even if you miss it, you can hop in and watch and comment. There’s also a giveaway donated by Sizzix… Hope to see you there this week!
Don’t forget to follow me on social media for the latest happenings!
Hello everyone, all month-long the Inspiration Team has been showing you how to create with Crescent and Sizzix. The past few weeks we’ve seen creative ways to use Crescent Products like Photo Mat Art Boards and RENDR paper with Eileen Hull Sizzix dies. Although our collaboration with Crescent is coming to an end the IT still has some fun new project ideas to share with you. If you’re just tuning in you can catch up on all of the previous Crescent/Sizzix creations at the end of this post.

The Inspiration Team really enjoyed creating with Crescent products and I know you will too. I’m sure you’ll be seeing Crescent products in Inspiration Team projects again real soon. In the meantime let’s have a look at what the team has to share with you this week.
Jonathan Fong shows how you can create with Crescent in unexpected ways. Check out Jonathan’s AMAZING Paint Chip Dollhouse created with Crescent Photo Mat Art Boards and my Sizzix Square Box die! Every crafty dream house needs a sky light. Jonathan used the Photo Mat Art Board from Crescent to create a modern day must have in his darling Paint Chip Doll House.

Visit Jonathan’s Blog where he’s sharing the creative “blueprints” he used to create this stylish doll house with Crescent and Eileen Hull Sizzix dies.
Shelly Hickox is sharing a magnificent mixed-media collage piece featuring Crescent Photo Mat Art Boards, RENDR paper and my Sizzix dies from Paper Flower Party and Vintage Kitchen. The Crescent Photo Mat has withstood the test of all the mixed-media tricks Shelly could throw at it. Shelly’s photo canvas is decorated with everything you can think of from die cuts, to Distress Sprays, to DecoArt Media! Let’s not forget to mention the lovely mix of metallic flowers and ephemera. Can you tell which ones are real metal from the painted RENDR paper Sizzix die cuts?

Take a creative journey to Shelly’s Blog where she shares all of her creative tips and tricks on how to create with Crescent.
Diana Hetherington shows just how great RENDR paper is for Art Journaling. Our dear Diana used my Heart and Soul Flower die to create custom foam stamps for her colorful art journal page. She used DecoArt Media paints to color this joyful page and thanks to the magic of RENDR paper was able to stamp, stencil and doodle on top of those paints to create the gorgeous page you see here.

Stop by Diana’s Blog for a closer look at all the stages of her art journal journey and discover what she may have in store for this lovely creation.
Julia Aston takes us to a whole new dimension of creating with Crescent. This Galaxy Photo Mat Board with paper landscapes is out of this world! Think that Galaxy print is patterned paper? Nope! It’s paint…and Julia shows you exactly how she did it. You’ll also learn how to use my Sizzix Textured Embossing Folders to create pretty RENDR paper landscapes!

Blast off to the creative universe that is Julia’s Blog and learn how to create you’re own Galaxy Background and RENDR Paper Landscapes.
Lisa Hoel has a lovely RENDR paper Passport Book Journal to share. Aren’t those Cherry Blossoms lovely? Lisa used my Sizzix Pansy die from Paper Flower Party to cut them from inked RENDR paper. They look as delicate as the real thing don’t you think? Just wait till you see the RENDR Paper pages she has in store for you!

Let your creativity blossom over at Lisa’s blog where she shows you how to make paper flowers and journal pages out of RENDR paper and Eileen Hull Sizzix dies.
Anne Redfern takes us on another under the sea adventure with her second project. Anne turned her Photo Mat Art Board into an ocean scene fit for King Triton! Colors and textures oh my! I can almost smell the salty air and feel the sand beneath my feet. Anne used texture pastes, inks, paints and a variety of Sizzix dies to create this beautiful ocean scene.

Dive in to Anne’s blog for all the details on how to create your own creative sea scape with Crescent Photo Mat Boards and Sizzix!

I hope you enjoyed seeing all of the amazing ways you can create with Crescent Products and my Sizzix dies. You can learn more about Crescent Products HERE and in case you missed any of the previous projects you can check them out by following the links below…
Stay tuned next week for more creative projects from the Inspiration Team!
Eileen


