• Email
  • Facebook
  • Instagram
  • Pinterest
  • Twitter
  • YouTube

Eileen Hull

Three dimensional art... with heart

  • Home
  • About
  • Products
    • Sizzix
  • The Paper Trail
  • Facebook Live
  • Project Videos
  • Blog
  • Videos and Press

Ann Butler Blog Hop with Sizzix Cradle Die

31 Jan

I had so much fun making this project! It brought me back to my childhood days of making doll accessories. I was the oldest of six kids- with four girls in five years. (Mom- what were you thinking?) My sisters and I spent HOURS playing with dolls, making clothes and furniture, sending them on trips, having plays…

One Christmas, Mom made each of our forty dolls a new outfit and arranged them in the living room on all of the furniture and we came in after Christmas Mass to find them. What an amazing present! One doll, Bridie, even had a string of pearls and a blue velvet dress- I loved her…

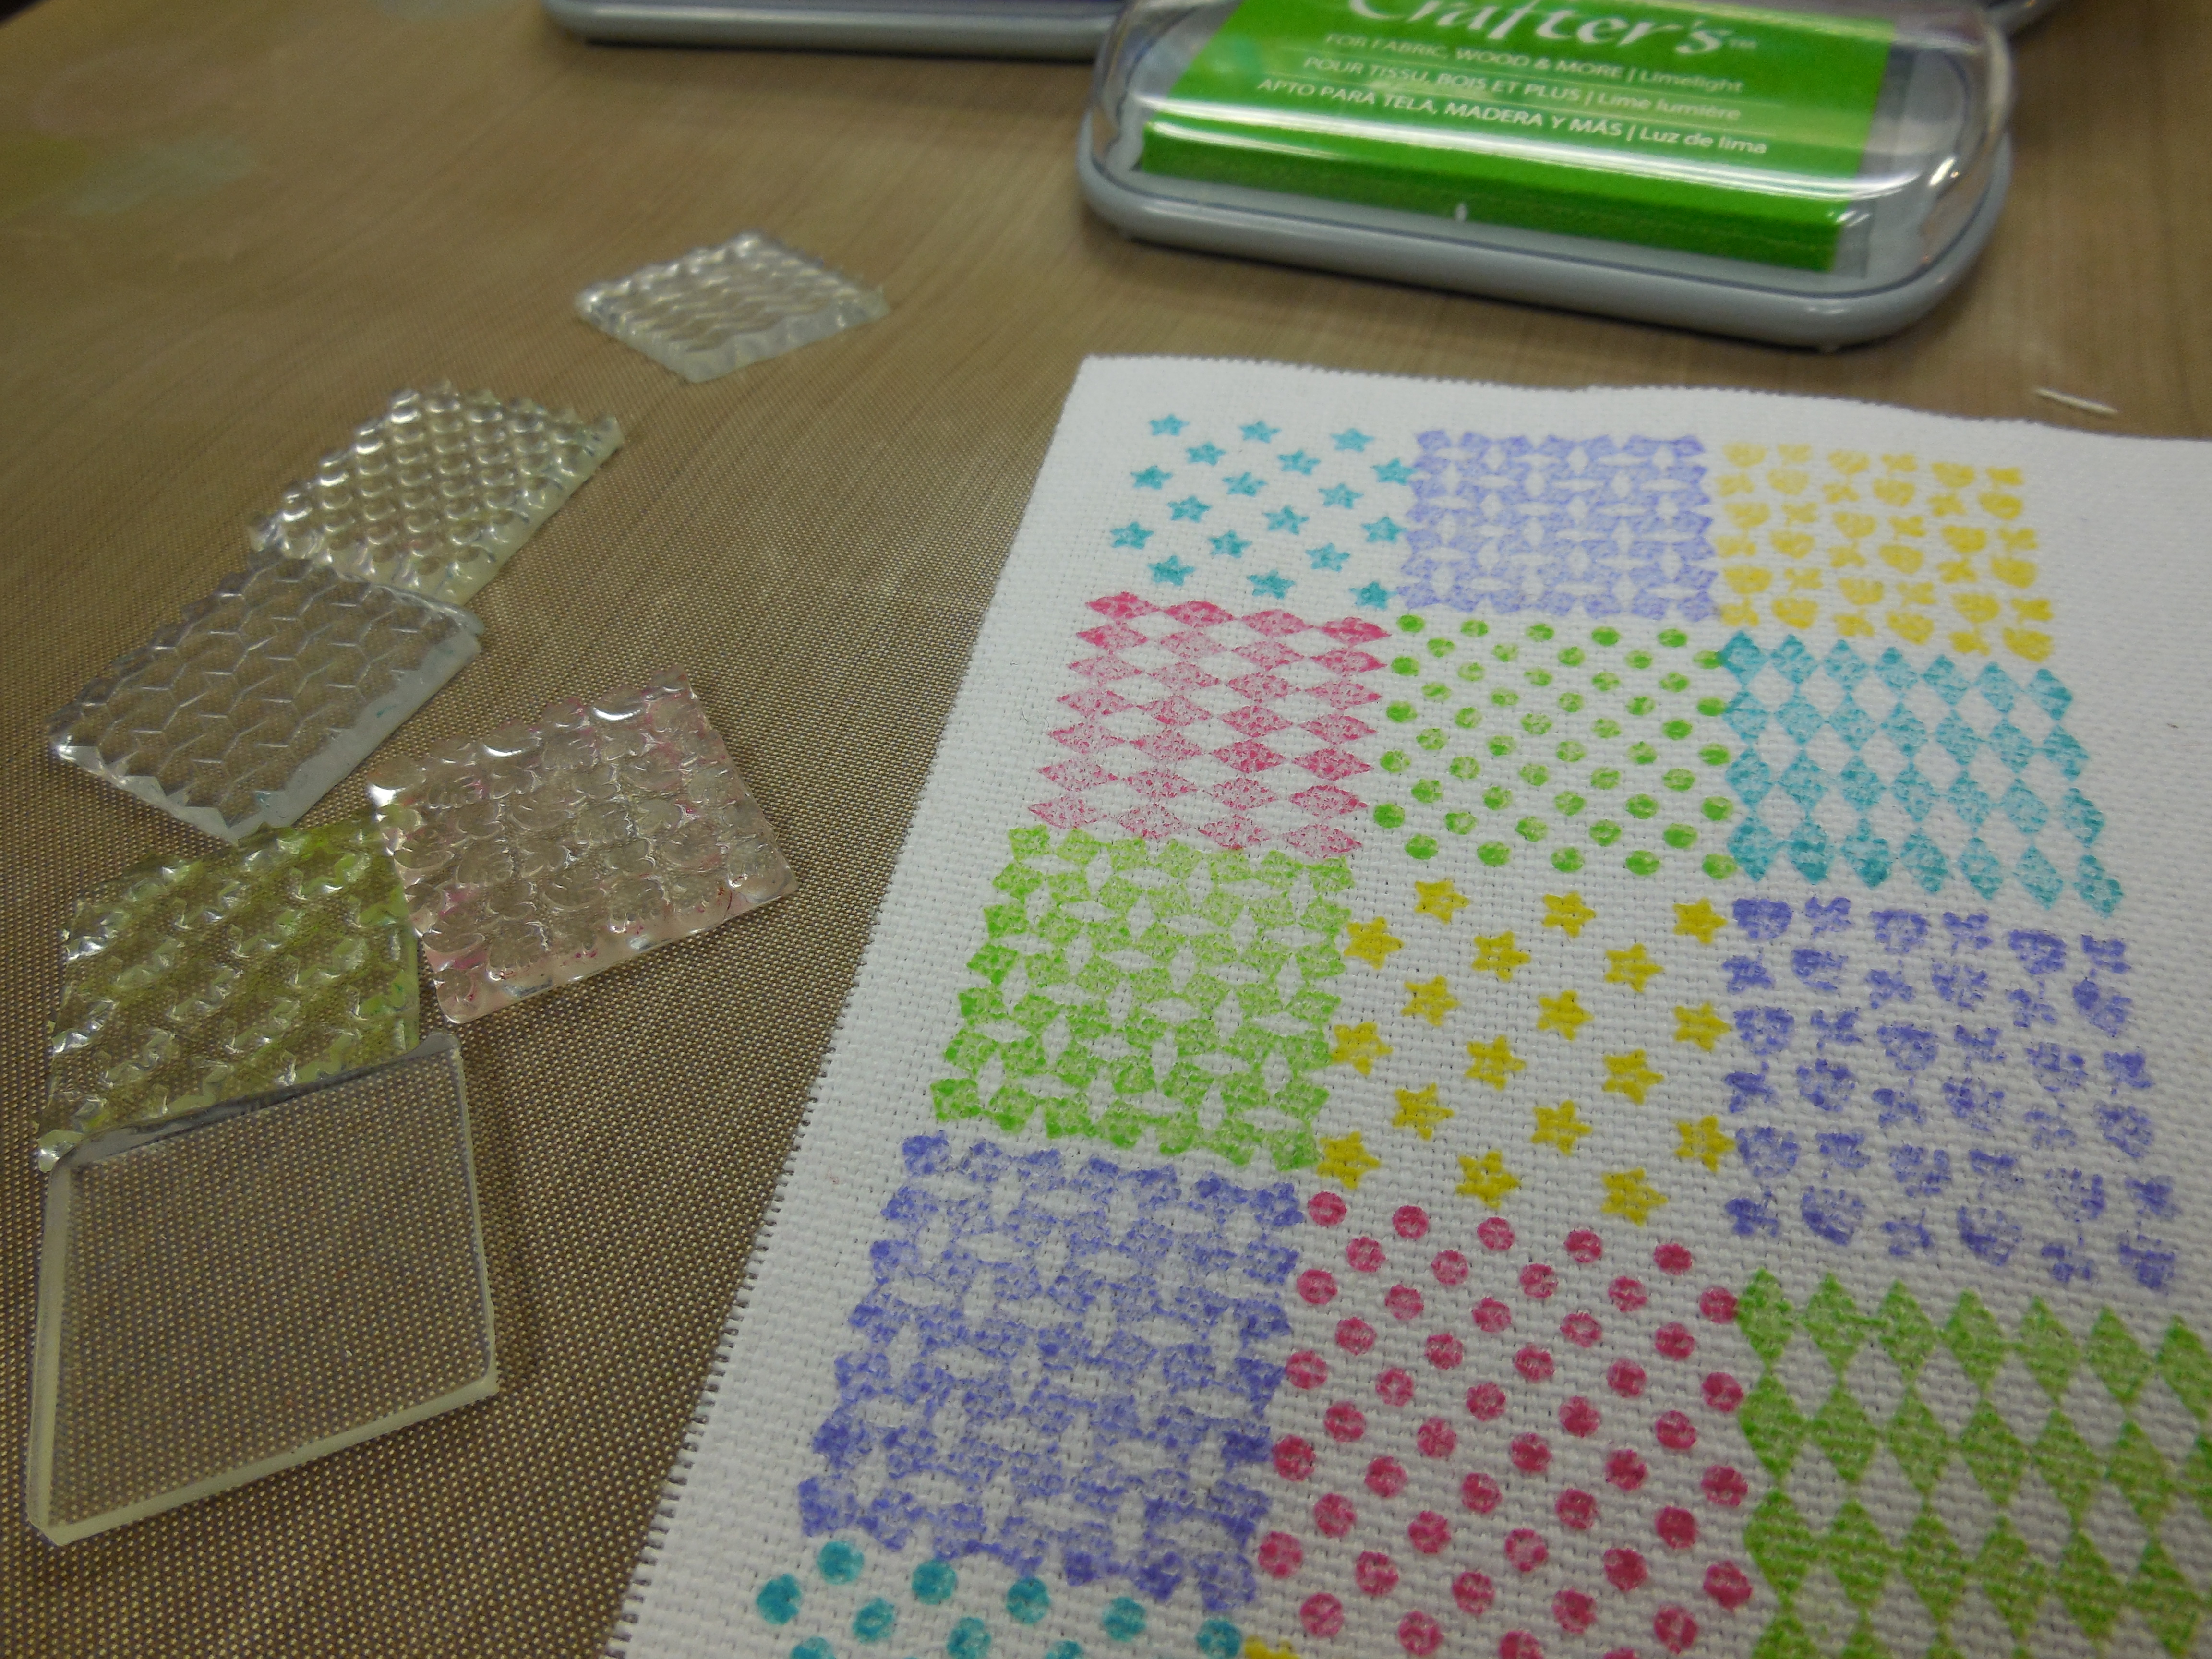
So I decided to make a cradle from my new Sizzix Cherished collection.  And I used Ann Butler EZ-De’s stamps  and Ann Butler Clearsnap inks to make a doll quilt and pillow! I love the pretty ink colors- and being Clearsnap Crafter’s Ink, the colors are permanent… Having one inch stamps are handy for these small areas. It was so much fun to stamp out a tiny quilt in just a few minutes. Good job Ann!

Ann-Butler-blog-hop

Make sure you see what all of the designers on the hop have created! I can’t wait to check them out:

 Amy Bowerman

Ann Butler

Candice Windham

Cindi Bisson

Cheryl Boglioli

Eileen Hull

Jen Goode

Madeline Arendt

Sharon Reinhart

You will need:

  • Sizzix Cradle ScoreBoards die
  • Golden Book and pages to die cut
  • matboard
  • Ann Butler EZ-De’s stamps 
  • Ann Butler Clearsnap inks
  • glue gun
  • spray adhesive
  • Fabri-Tac by Beacon
  • white twill material
  • ruffled trim

DSCN0922

Die cut two headboards from Golden Books. Cover a piece of matboard front and back with pages from the Golden Books, using spray adhesive to adhere. Die cut crib bed from matboard.

Ann-Butler-blog-hop-crib

Assemble crib using glue gun to secure. This is a job for a heavy duty adhesive, especially if it will be played with! Measure the inside of the crib and cut a piece of white fabric for a blanket. Use another piece for a pillow.

Ann-Butler-blog-hop

Stamp the fabric using different color inks and alternating stamp shapes to make the pattern interesting. Since this was a small project, I used the one inch stamps. I could not find the orange stamp pad anywhere! I can pretty much guarantee it will turn up the minute I finish this post.

Ann-Butler-blog-hop4

Cut two strips of ruffled trim. Turn ends under and sew down or glue. Adhere to the crib with the glue gun.

DSCN0927

Ann-Butler-blog-hop-with-doll

I put a small piece of batting in the bottom of the crib for a little mattress. Place blanket and pillow inside crib. Add doll and play!

Thanks for stopping by and remember to check out all of the other projects on the hop!

Categories:
Blog Hop, Projects, Sizzix

Valentine Tag

28 Jan

I am back! After CHA I caught some kind of flu and am just now feeling back to normal. Being sick is a big pain but it makes me so grateful for feeling good normally…

Valentine’s Day will be here before we know it! Here’s a quick tag that would also work great on a card.

You-and-me-jar-eileenhull.com

  1. Die cut the larger die from my Sizzix Canning Jar die from off- white cardstock with a Heart Mover and Shaper insert.
  2. Die cut another solid Canning Jar from red cardstock and adhere beneath the off-white jar.
  3. Punch a small hole in the top of the can and tie with red baker’s twine.
  4. Stamp a sentiment at the bottom of the jar. (I used a stamp from Glitz Design.)
  5. Tie a pice of twine around the top of the jar.

That’s it! More coming soon…

Categories:
Holiday Crafts, Projects, Uncategorized

Embossed Bird Ornaments

17 Dec

Just a quick post today… I wanted to share an idea that kept going through my head- I finally sat down and made it!

I die cut my Sizzix Scoreboards Bird die and wings from matboard, then ran it through the Big Shot with the Lace set embossing folder. I lightly inked the raised areas with Clearsnap ink, glued the wings on punched, two holes in the top of the bird and added a wire to hang it with.
A little birdie told me to wish you a Merry Christmas…

Categories:
Projects

Stamped Mini-Album and InspiredCo ezine

6 Dec

I am so excited to show you what Pam Keravuori has created! She went to town with my new Craffiti Direct stamps and made a project using all three sets in one project!

I love how Pam uses materials and combines colors, don’t you?
Pam will share how-to’s next week on her blog, Pamela Jane’s Studio. This week she is busy having the roof of her garage taken off in preparation for the fabulous studio that is being added to her house!
Also, my friend Amy Powers, editor of the Inspired Ideas ezine, has published the Holiday issue! Go here to order. It is just so HAPPY- it will definitely get you in the holiday spirit and give you lots of ideas too!
Amy is also teaching a class with Big Picture Classes right now and I am enjoying it immensely (although I am not getting my assignments done- they are visions of sugarplums dancing in my head right now!)
I am blessed to live near (within lunching distance) of these two amazing artists and always look forward to sharing creative adventures with them!

Categories:
Projects

Day 3 Stamp Release

27 Nov

I have featured one of my new Craffiti Direct stamps sets for the last two days and here is the last one. It is called Flower Sentiments and I am really excited about this set because it is so versatile! It comes with ten tiny sentiments which I will use all the time for tags and gift cards.  


The sentiments included in the set are:
  • happy birthday
  • congrats
  • thank you
  • so glad
  • hi friend
  • give thanks
  • I’m sorry
  • love you
  • best wishes
  • safe travels 

… and the words fit perfectly in the center of the flower! You can stamp up a bunch of cards and flowers, then fill in the sentiments as needed. Quick and easy! There is also a funky leaf, stem and quote stem. The stamps are available to purchase on the Craffiti Direct site.

But wait- there’s more! The flower shape fits inside some of my 3D Sizzix flower dies! If you have these Sizzix dies: Fringed Flower, Flower Layers #9, Flower Layers with Heart Petals, or Labels & Buttons, you are in luck! The Leaves die (smallest leaf) works with the leaf stamp in this set also.


Here’s a Thanksgiving card for you… 

  1. Stamp Barn Wood background in white on Desert Storm card base. Ink and blend edges in light brown. Stamp stem on card in black ink. (do not smear like I did :-()
  2. Die cut flowers and leaves from white cardstock. Stamp the flower image on top. You can get some interesting images if you stack two white flowers on top of each other, then stamp.
  3. Color flower in with markers. Die cut leaves and color.
  4. Cut an larger solid orange flower, add a glue dot in the middle, then place the smaller colored in flower on top.
  5. Assemble pieces on card and adhere with double sided tape or glue.
I can’t wait till Thanksgiving!  I am going to get out my Copic markers after we eat

dinner and just color in flowers all afternoon in every combo I like… after my nap of course! 

 
I showed you a box of tags and labels that I made using the Heart Tattoo set yesterday. I promised you a video showing how to make magic with this stamp set but decided to keep it with yesterday’s post. You can view it here.
 
Don’t forget- there are a few days left of a Rafflecopter giveaway– someone is going to win a complete set of these new stamps! It just takes a few seconds to fill it out. 


Thanks so much for following along to see what’s new with me… I hope you have a safe and blessed Thanksgiving!

Categories:
Projects

Day 2 Stamp Release

26 Nov

Today is was 24 degrees out! I am definitely getting in the Christmas spirit… so here are some more ways to make quick and easy gift boxes and tags! 

 
The new Craffiti stamp set I am featuring today is called Heart Tattoo. I don’t have a tattoo… but if I did, I would get a pretty one like this 🙂  


These borders were so much fun to design. I like hearts but didn’t want “cute”, so I fiddled… and fiddled… and fiddled some more in Illustrator until I came out with two uncute coordinating heart patterns. They fit just right on an A-2 card. You can alternate borders in different colors to create a kind of wallpaper effect or just stamp one as the perfect accent on a card. They can also be joined and repeated as a stripe or border on a layout.


To make this project, I stamped on my Sizzix Box with Scalloped Flap (which you can find in Michael’s) and Labels & Buttons from the die with the same name. I used a watermark ink pad and some chalks to make color magically appear! I also used a permanent pen to decorate and letter the tags.

 
I used a resist chalking technique that I learned a while ago. I just love how soft it looks. When the color comes out it’s like magic. I did a video because it is something that you have to watch so I will post it on Wednesday.
 
EDIT: See the video here!


So here is the stamp of the day!
Don’t forget to take a minute and enter here to win a Rafflecopter giveaway. 


How would you use this stamp? What is your favorite type of stamp- cute, grungy, vintage, clean or graphic? I want to know what kind of stamps you are looking for… because I want to make more stamps- tell me what you want! 


Thanks for stopping by! 

Categories:
Projects

  • « Previous Page
  • 1
  • …
  • 21
  • 22
  • 23
  • 24
  • 25
  • …
  • 27
  • Next Page »

Meet Eileen

I grew up in a big family where there was always an art project in the works. Learning to think creatively has been a huge benefit throughout my life: from thirteen military moves and raising four children to developing product lines for craft manufacturers. Come visit and see a slice of my life...
Read More…

Eileen Hull Creative Team 2025

Sign up for my weekly newsletter!

Join the Eileen Hull Fan Club

Join the Eileen Hull Fan Club

Archives

Categories

-http://bellacraftspublishing.com/gifts-to-die-for-with-eileen-hull

Featured in

Where Women Create BUSINESS Spring 2015

Dollar Tree

Copyright © 2026 · Bloom theme by Restored 316

Copyright © 2026 · Bloom Theme on Genesis Framework · WordPress · Log in